
Exploring Perlin Noise in Python
Generating coherent noise for all manner of simulations and games
First of all, I would like to say that the code in this post was inspired by Adrian Biagioli’s article on Perlin Noise, which can be found here. That being said, this really isn’t going to be a primer on Perlin Noise itself, rather it’s going to focus on its implementation in Python. First, a recap of the converted C++ code from Adrian’s article:
We start by creating the permutation array which later gives us our ‘random’ gradients. These values are taken directly from Biagioli’s article so we can get similar results, but you can easily randomly generate the gradients (range [0, 255]) for a different approach. We extend p by p so the indices seem to “wrap around”. Finally we define a namedtuple class Vector, making xyz-coordinates much easier to handle.
from collections import namedtuple

p = [151, 160, 137, 91, 90, 15,
     131, 13, 201, 95, 96, 53, 194, 233, 7, 225, 140, 36, 103, 30, 69, 142, 8, 99, 37, 240, 21, 10, 23,
     190, 6, 148, 247, 120, 234, 75, 0, 26, 197, 62, 94, 252, 219, 203, 117, 35, 11, 32, 57, 177, 33,
     88, 237, 149, 56, 87, 174, 20, 125, 136, 171, 168, 68, 175, 74, 165, 71, 134, 139, 48, 27, 166,
     77, 146, 158, 231, 83, 111, 229, 122, 60, 211, 133, 230, 220, 105, 92, 41, 55, 46, 245, 40, 244,
     102, 143, 54, 65, 25, 63, 161, 1, 216, 80, 73, 209, 76, 132, 187, 208, 89, 18, 169, 200, 196,
     135, 130, 116, 188, 159, 86, 164, 100, 109, 198, 173, 186, 3, 64, 52, 217, 226, 250, 124, 123,
     5, 202, 38, 147, 118, 126, 255, 82, 85, 212, 207, 206, 59, 227, 47, 16, 58, 17, 182, 189, 28, 42,
     223, 183, 170, 213, 119, 248, 152, 2, 44, 154, 163, 70, 221, 153, 101, 155, 167, 43, 172, 9,
     129, 22, 39, 253, 19, 98, 108, 110, 79, 113, 224, 232, 178, 185, 112, 104, 218, 246, 97, 228,
     251, 34, 242, 193, 238, 210, 144, 12, 191, 179, 162, 241, 81, 51, 145, 235, 249, 14, 239, 107,
     49, 192, 214, 31, 181, 199, 106, 157, 184, 84, 204, 176, 115, 121, 50, 45, 127, 4, 150, 254,
     138, 236, 205, 93, 222, 114, 67, 29, 24, 72, 243, 141, 128, 195, 78, 66, 215, 61, 156, 180]
p.extend(p)

Vector = namedtuple('Vector', 'x y z')
We’re now ready to begin implementing the actual Perlin algorithm.
import math
def perlin(x, y, z):
    arglist = Vector(x, y, z)
    if repeat > 0:
        arglist = Vector(*map(lambda x: x % repeat, arglist))
    float_args, int_args = [Vector(*l) for l in zip(*list(map(math.modf, arglist)))]
    int_args = Vector(*map(int, int_args))
    ...
I kept the function signatures the same as the C++ code (taking 3 ints instead of a Vector), instead of converting them to take a single Vector, so they could be used similarly to how they are in Biagioli’s tutorial. However, once we’ve entered the function, anything is fair
game. So we convert them into a Vector class, then use math.modf to split the values into int and float parts.
The fade function is trivial to implement, as it simply returns 6t5-15t4+10t3, and
luckily, we can simply map the function over the float_args to get all results at once.
def fade(t):
    return 6*t**5 - 15*t**4 + 10*t**3

def perlin(x, y, z):
    ...
    fade_vector = Vector(*map(fade, float_args))
    ...
Now, I’ll be the first to admit, my implementation of the hash and inc functions aren’t very Pythonic, and still
carries the C “accent” of the source material. I’m sure there some matrix or combinatoric operation going on here that’s
built in. At the very least, I could find a way to rip out the inc method and write it straight into the perlin function
while still maintaining the ‘repeat’ functionality. However, because I understand this part the least, I’m most tempted
to leave it alone.
def inc(num):
    num += 1
    if repeat > 0:
        num %= repeat
    return num

def perlin(x, y, z):
    ...
    aaa = hash_row(*int_args)
    aba = hash_row(int_args.x, inc(int_args.y), int_args.z)
    aab = hash_row(int_args.x, int_args.y, inc(int_args.z))
    abb = hash_row(int_args.x, inc(int_args.y), inc(int_args.z))
    baa = hash_row(inc(int_args.x), int_args.y, int_args.z)
    bba = hash_row(inc(int_args.x), inc(int_args.y), int_args.z)
    bab = hash_row(inc(int_args.x), int_args.y, inc(int_args.z))
    bbb = hash_row(*map(inc, int_args))
    ...
The grad function’s goal is to generate the random vectors for the unit cube currently being processed. The article
presents two ways of doing this.
def grad_slow(hash_list, x, y, z):
    h = hash_list & 15
    u = x if h < 8 else y
    if h < 4:
        v = y
    elif h == 12 or h == 14:
        v = x
    else:
        v = z
    return (u if (h & 1) == 0 else -u) + (v if (h & 2) == 0 else -v)

def grad_fast(hash_list, x, y, z):  # Will be referred to as just 'grad' from now on.
    switch = hash_list & 0xF
    if switch == 0x0:
        return x + y
    elif switch == 0x1:
        return -x + y
    elif switch == 0x2:
        return x - y
    elif switch == 0x3:
        return -x - y
    elif switch == 0x4:
        return x + z
    elif switch == 0x5:
        return -x + z
    elif switch == 0x6:
        return x - z
    elif switch == 0x7:
        return -x - z
    elif switch == 0x8:
        return y + z
    elif switch == 0x9:
        return -y + z
    elif switch == 0xA:
        return y - z
    elif switch == 0xB:
        return -y - z
    elif switch == 0xC:
        return y + x
    elif switch == 0xD:
        return -y + z
    elif switch == 0xE:
        return y - x
    elif switch == 0xF:
        return -y - z
These two functions essentially produce the same results. However, grad_fast simply returns the pre-calculated results
for the entire state space of hash_list & 0x0F. This means we only have to make 1 comparison instead of 6, and one logical
AND statement instead of 3. Because of this, henceforth grad will refer to grad_fast.
Now, we add a quick linear interpolation function, lerp.
def lerp(a, b, x):
    return a + x * (b - a)
And we are ready to put it all together at the end of the perlin function.
    x1 = lerp(grad(aaa, *float_args), grad(baa, float_args.x - 1, float_args.y, float_args.z), fade_vector.x)
    x2 = lerp(grad(aba, float_args.x, float_args.y - 1, float_args.z),
              grad(bba, float_args.x - 1, float_args.y - 1, float_args.z), fade_vector.x)
    y1 = lerp(x1, x2, fade_vector.y)
    x1 = lerp(grad(aab, float_args.x, float_args.y, float_args.z - 1),
              grad(bab, float_args.x - 1, float_args.y, float_args.z - 1), fade_vector.x)
    x2 = lerp(grad(abb, float_args.x, float_args.y - 1, float_args.z - 1),
              grad(bbb, float_args.x - 1, float_args.y - 1, float_args.z - 1), fade_vector.x)
    y2 = lerp(x1, x2, fade_vector.y)

    return (lerp(y1, y2, fade_vector.z) + 1) / 2
Interpolating from gradients around the unit cube is what gives it it’s apparent “coherency”.
In order to get a nice output, we try outputting a 2D map image. We should hopefully see some grey blobs
import numpy as np
import scipy.misc as smp
# Size of the screen
SCREEN_WIDTH = 300
SCREEN_HEIGHT = 300

# how fine the noise is. lower => finer features
UNIT_CUBE = 128

def main():
    starttime = time()
    data = np.zeros((SCREEN_WIDTH, SCREEN_HEIGHT, 3), dtype=np.uint8)
    # choose a random z-slice to get a random image back. otherwise perlin() always returns the same map (z=0)
    z = randint(1, UNIT_CUBE)

    for x in range(SCREEN_WIDTH):
        for y in range(SCREEN_HEIGHT):
            value = perlin(x // UNIT_CUBE + (x % UNIT_CUBE) / UNIT_CUBE, y // UNIT_CUBE + (y % UNIT_CUBE) / UNIT_CUBE,
                           z)
            data[x, y] = list(map(int, (255 * value, 255 * value, 255 * value)))

    img = smp.toimage(data)
    img.show()
    print("Time elapsed: " + str(time() - starttime))
When we’re doing something like x // UNIT_CUBE + (x % UNIT_CUBE) / UNIT_CUBE in our call to perlin, we’re trying to
convert from the pixel coordinate system to the UNIT_CUBE coordinate system. This way, we get nice floating point input
numbers for x, y and z.
Your output might look something like this:
In order to add more feature diversity to the noise, we can implement the OctavePerlin function, which sums together
perlin ‘waveforms’ with different amplitudes and frequencies.
def octave_perlin(x, y, z, octaves, persistence):
    total = 0
    frequency = 1
    amplitude = 1
    maxValue = 0
    for i in range(octaves):
        total += perlin(x * frequency, y * frequency, z * frequency) * amplitude
        maxValue += amplitude
        amplitude += persistence
        frequency *= 2
    return total / maxValue
Using the parameters octaves = 5 and persistence = 0.75, I produced this image:

This marks the end of the “official” Perlin Tutorial. However, I wasn’t satisfied, and I wanted to add color to the noise (so it would look like a heat-map).
In order to do this, I first need to find a way to map [0.0-1.0] to a color gradient. Luckily, I already had a HuetoRGB
function around that would convert an angle in degrees [0-360] to an RGB color [0-255][x3]
def HueToRGB(h, s=1, v=1):
    h = float(h)
    s = float(s)
    v = float(v)
    h60 = h / 60.0
    h60f = math.floor(h60)
    hi = int(h60f) % 6
    f = h60 - h60f
    p = v * (1 - s)
    q = v * (1 - f * s)
    t = v * (1 - (1 - f) * s)
    r, g, b = 0, 0, 0
    if hi == 0:
        r, g, b = v, t, p
    elif hi == 1:
        r, g, b = q, v, p
    elif hi == 2:
        r, g, b = p, v, t
    elif hi == 3:
        r, g, b = p, q, v
    elif hi == 4:
        r, g, b = t, p, v
    elif hi == 5:
        r, g, b = v, p, q
    r, g, b = int(r * 255), int(g * 255), int(b * 255)
    return r, g, b
Then, we add the function to our image generator in main:
def main():
starttime = time()
data = np.zeros((SCREEN_WIDTH, SCREEN_HEIGHT, 3), dtype=np.uint8)
# choose a random z-slice to get a random image back. otherwise perlin() always returns the same map (z=0)
z = randint(1, UNIT_CUBE)
for x in range(SCREEN_WIDTH):
for y in range(SCREEN_HEIGHT):
value = perlin(x // UNIT_CUBE + (x % UNIT_CUBE) / UNIT_CUBE, y // UNIT_CUBE + (y % UNIT_CUBE) / UNIT_CUBE,
z) # Currently doesn't work with OctavePerlin
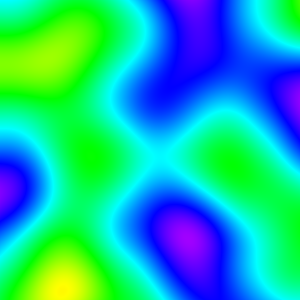
r, g, b = HueToRGB(value * 360)
data[x, y] = list(map(int, (r, g, b)))
img = smp.toimage(data)
img.show()
print("Time elapsed: " + str(time() - starttime))
Running this gives us a beautiful image like this one:
The code for this exercise can be found here
In my next Perlin Noise post, I’ll be talking about 3D Noise, and the noise python library.